Planning and operation
General info
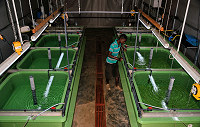 The
indoor hatchery can be used in the entire breeding season in Malawi
from about October to March. The production capacity ranges from about
0.8 Mill. to 1 Mill. fingerlings in a breeding season (about 6 months, each
takes about 3 weeks, with about 50,000 larvae
reared in each tank unit). The capacity of the hatchery is
sufficient, to provide enough fingerling to 15-20 rural fish farms
in Malawi, depending of their pond number and size. (usual stocking
density in the farmers pond 5 fingerlings/cbm).
The
indoor hatchery can be used in the entire breeding season in Malawi
from about October to March. The production capacity ranges from about
0.8 Mill. to 1 Mill. fingerlings in a breeding season (about 6 months, each
takes about 3 weeks, with about 50,000 larvae
reared in each tank unit). The capacity of the hatchery is
sufficient, to provide enough fingerling to 15-20 rural fish farms
in Malawi, depending of their pond number and size. (usual stocking
density in the farmers pond 5 fingerlings/cbm).
Starting a rearing trial
A new rearing trial needs clean and empty tanks and clean working equipment. If there were any issues with diseases (virus/bacterial infections, fungi) in the previous trial, disinfection of the rearing tanks and the submerged equipment should be considered. If chlorine-based disinfection is applied, be very careful to check if all the materials (of tanks and equipment) are sensitive to chlorine. Please apply disinfection always according to the advices of the manufacturer; wrong application may be harmful for humans, the equipment (chlorine is basically corrosive!) and subsequently for the fish larvae which will be stocked. Rinse all equipment which got in touch with chlorine thorougly with clean water.
Then both large tanks needs to be filled with water well in advance to the next trial, a week before is a perfect timing. Recommendation at this point in time is the well water from the shallow well, since it has no or not that much calcium carbonate as the borehole water, which may ruin, from experience, the pumps in the tanks and the heater, which may be incrusted with calcium and reduce their efficiency tremendously.
Measures when filling completely empty tanks
Take care that the following conditions apply before filling of the large tank starts:
- Standpipes (those with the wholes and the gauze outside) inside of the small tanks temporarily removed.
- Overflow regulating pipes from the small tanks temporarily removed, so that water can penetrate from outside into the small tanks. Failing to do that, will lift up the small tanks with increasing water level outside in the big tanks and may break the pipes!
- Fill water into the large tanks. Use a filter cartouche to prevent debris flowing into the tanks from the well. The water level should finally be the same inside and outside of the smaller and the big tanks (check the water level after introducing the overflow pipes in the small tanks and after starting the pumps. It may be necessary to add some water outside in the big tanks after the small tanks are completely filled; as mentioned water level inside and outside of the small tanks should be at the same level.
Measures after filling the tanks
- When all tanks are filled with water to the desired level, the pumps, aeration and heaters can be switched on. The power socket for the heater is connected with a control unit. Never connect a heater right away to a power socket, always use the power socket of the control unit in order to be able to adjust the temperature to desired values! Make sure that the sensor of the control unit is deployed and free floating in one of the rearing tanks and well separated from the main heater in the large tank..
- Plug-in the standpipes in the middle of the rearing tanks, and put back the overflow pipes outside of the rearing tanks which fixes the water level inside of the rearing tanks.
- Make sure that all pumps are running as desired (for the circulation in the big tanks check at the end of the tubes, coming from the bigger pump in the large tank, ending up in the filter box. It is important to check the water flow into the filterbox every day, since sometimes the pipe which sucks the water from the big tank may be clogged (debris or dead fish which stick on the protective gauze).
- Check if the heaters are working (remove them BRIEFLY out of the water and feel if they are getting hot, then put them back quickly). Heaters have to hang free floating in the water body of the big tank, without touching anything. Please note: if you want to handle heaters outside of the water (e.g. cleaning) ALWAYS disconnect them before removing them from the water, otherwise hands can get burned and heaters will be damaged.
Water circulation
It is important to understand exactly the water circulation in the tanks of the hatchery. There are two independent ways of water circulation per unit. One way circulates the water from the big tank out to the filter device, through the UV-Lamp unit and arrives back in the tank in the large filter box . The smaller pump circulates the water from the big tank through the small rearing tanks, a by-pass guides water back to the big tank; another by-pass is feeding the biofilter. Each of the outlets have a ball valve, which can be used to adjust the water flow.
The flow through the biofilter-box may needs adjustments according to the efficiency of the filter but should never be too strong. In order to allow the nitrification in the biofilter, water has to pass rather slowly though the filling material. Make the decision about the flow-through based on the measurements of ammonium and nitrate in the tank water. Low ammonium and increasing nitrate values in tank water indicate a well-working biofilter (refer also to the Chapter "Water parameter measurements").
Aeration
 A proper aeration is important to recharge the water in the big tank
with oxygen from the atmosphere. The most efficient enrichment with
oxygen takes place on the surface of the water, less through the
upcoming bubbles.
A proper aeration is important to recharge the water in the big tank
with oxygen from the atmosphere. The most efficient enrichment with
oxygen takes place on the surface of the water, less through the
upcoming bubbles.
The system is mainly aerated in the big tank. Here, the aeration can be very strong, since this cannot harm the larvae inside the smaller tanks. The oxygen enriched water will then recirculate through the rearing tanks. Two air diffusors are installed in the big tank. There is one diffusor at each end of the tank in order to care about a homogenous water movement.
Inside of the rearing tanks, the aeration shall be very gentle, some coarse bubbles cares about a light upwelling specifically in very early larval stages; rough aeration has to be avoided since it will rather harm the small larvae. With post-larvae, aeration can be slightly increased, but do not use air stones in the rearing tanks.
As mentioned above, the biofilter needs a continuous strong aeration from below in order to supply sufficient oxygen to the nitrifying bacteria. Weak aeration may result in the growth of the "wrong" bacteria, which may produce hydrogen sulphide, which is very toxic for fish (has a strong smell like rotten eggs). There is only one aerator needed for both rearing units; the airpipe connects both tanks, which needs, however good care that all the regulating valves in both units are well adjusted to each other. Full open valves in one unit causes less air pressure at the other side, please always double check all air outlets when changing adjustments. Please have always in mind, that well-adjusted aeration, specifically in the large tanks, is a kind of life guard for the welfare of the larvae in the rearing tanks.
Illumination
Proper illumination is an important issue in indoor hatcheries, specifically when there is no daylight available. Fish larvae are visual feeder and do only feed when there is sufficient light available. The day/night rhythm (D/N, the hours with light and darkness) necessary for proper growth depends from the species; however, there are not yet sounding scientific data available which justify a certain D/N rhythm. In the case of the endemic tilapia species which are reared in the hatchery, a D/N rhythm of 12/12 is recommended. This rhythm should be adjusted with automatic timer.
Collecting eggs
 Eggs
are collected by capturing the brooders; since the target species
are mouth brooders, females are targeted. To retrieve the eggs,
females are put into a box with water and eggs are carefully rinsed
out of the mouth. Subsequently, eggs are collected from the box and
put into clean water-filled beakers. The beakers are used because
currently the farm has no egg collecting plates. The collected eggs
are then made sure that they are free from debris by sieving out all
the debris using fine mesh min-hand nets.
Eggs
are collected by capturing the brooders; since the target species
are mouth brooders, females are targeted. To retrieve the eggs,
females are put into a box with water and eggs are carefully rinsed
out of the mouth. Subsequently, eggs are collected from the box and
put into clean water-filled beakers. The beakers are used because
currently the farm has no egg collecting plates. The collected eggs
are then made sure that they are free from debris by sieving out all
the debris using fine mesh min-hand nets.
 These eggs are usually of different stages and are thus
categorized and put into different incubation jars depending of the
stage of egg development and species.
These eggs are usually of different stages and are thus
categorized and put into different incubation jars depending of the
stage of egg development and species.
Egg incubation starts immediately after retrieving the eggs from the brooders and eggs are put in the incubation jars according to the stage and species (for more details see next paragraph, Egg Incubation: McDonald unit).
Egg incubation: McDonald Unit
 The
purpose of this unit is to provide full control over the egg
breeding and hatching period (Figure 29). The fertilized eggs are
retrieved from the female tilapia and incubated into the jars. The
McDonald unit follows a very traditional method in Europe to breed
eggs from salmon or trout in Zuger glasses or
Zuger jars, the basic principle is the same as with the McDonald
jars (Figure 30).
The
purpose of this unit is to provide full control over the egg
breeding and hatching period (Figure 29). The fertilized eggs are
retrieved from the female tilapia and incubated into the jars. The
McDonald unit follows a very traditional method in Europe to breed
eggs from salmon or trout in Zuger glasses or
Zuger jars, the basic principle is the same as with the McDonald
jars (Figure 30).
Before using the McDonald unit, it has to be filled with water. Head and bottom tank need to be filled completely with water and the proper flow from the top to the bottom is a combination of pumping, flow through the jars and the water running through the by-pass.
Check carefully for a balanced flow before incubating eggs. The bottom tank shall not spill over. When everything runs well with the water circulation, the heater in the bottom tank can be turned on.
 Water flowing into these jars is carefully regulated and any
remaining debris is carefully removed from these jars. Incubation
period varies depending on the stage at the time of collection. Stage
1 eggs e.g. take six to seven days before reaching swim
up stage while on the other end stage 4 eggs take only 48 hours
before reaching a swim up stage fit enough to be transferred into
rearing tanks.
Water flowing into these jars is carefully regulated and any
remaining debris is carefully removed from these jars. Incubation
period varies depending on the stage at the time of collection. Stage
1 eggs e.g. take six to seven days before reaching swim
up stage while on the other end stage 4 eggs take only 48 hours
before reaching a swim up stage fit enough to be transferred into
rearing tanks.
Hatching rates can reach as high as 98 %. Most of the eggs that have been observed to die are those which are not fertilized and these are mostly seen to be white in color at the time of collection. These are however left together with the fertilized eggs to minimize handling which could cause injuries to the fertilized eggs there by affecting the hatching rates.
 When re-starting the McDonald unit, it has to be filled with clean
water and adjustments of the water flow have to be made as mentioned
above. Although the eggs may not produce much ammonium, this has to
be controlled from time to time. If partial water exchange is
necessary, turn off the heater first, then the pump and drain water
through the pipe in the bottom tank. Remove the standpipe in the
bottom tank and turn the pipe at the outside of the bottom tank to
the desired draining level.
When re-starting the McDonald unit, it has to be filled with clean
water and adjustments of the water flow have to be made as mentioned
above. Although the eggs may not produce much ammonium, this has to
be controlled from time to time. If partial water exchange is
necessary, turn off the heater first, then the pump and drain water
through the pipe in the bottom tank. Remove the standpipe in the
bottom tank and turn the pipe at the outside of the bottom tank to
the desired draining level.
Please note, that the jars with the eggs are not running empty with a partial water exchange. Refill the bottom tank, turn on the pump and refill water as long as the previously adjusted balance among the water level in the head and bottom tank was achieved. Please note, that head and bottom tank have to be filled always completely with water. Otherwise, the pump in the bottom tank can run dry and fail eventually.
Larval incubation
 Upon
reaching swim up stages, the larvae are collected from the jars and
transferred into the rearing tanks. If larvae are
hatching more or less at the same point in time, the complete jar
can be removed from the McDonald unit and drained into a rearing
tank. The stocking density in the rearing tanks may reach up to 10.000-15.000 larvae per cbm.
Upon
reaching swim up stages, the larvae are collected from the jars and
transferred into the rearing tanks. If larvae are
hatching more or less at the same point in time, the complete jar
can be removed from the McDonald unit and drained into a rearing
tank. The stocking density in the rearing tanks may reach up to 10.000-15.000 larvae per cbm.
Handling of fry beyond hatchery stage
 One
trial in the indoor hatchery takes about 3-4 weeks (depending on the
temperature), subsequently the post larvae are introduced into Hapas
in the ponds of the farm where they are able to adapt to
pond conditions in a protected environment, and are raised until
they have reached the right size to be disseminated to the farmer
(about 10-15 g).
One
trial in the indoor hatchery takes about 3-4 weeks (depending on the
temperature), subsequently the post larvae are introduced into Hapas
in the ponds of the farm where they are able to adapt to
pond conditions in a protected environment, and are raised until
they have reached the right size to be disseminated to the farmer
(about 10-15 g).
Feeding of fish larvae
 Proper
feeding of the larvae in the rearing tanks is of vital significance
to achieve finally viable fingerlings. Since the feeding conditions
are somewhat different depending from the species, only general
instructions are given here.
Proper
feeding of the larvae in the rearing tanks is of vital significance
to achieve finally viable fingerlings. Since the feeding conditions
are somewhat different depending from the species, only general
instructions are given here.
For more detailed feeding instructions consult the related literature and rely on previous experience. Nevertheless, what can be claimed here in general is that two parameters are of major importance:
- the quality of the feed, which needs to be adapted at least in size to the ontogenetic stages (thumb rule: the older the larvae the larger the size of the feed particles)
- the frequency and amount of feed administered to the larvae (thumb rule: older larvae need less frequent feeding but higher amount per feeding event)
Feeding frequency has to be higher in younger larvae, every 30-60 minutes, new feed should be delivered to the larvae. The amount of feed needs to be adapted to the ontogenetic stage of the larvae. Feeding amount should be in a range that larvae are apparently saturated after each feeding event. Often, the amount of feeding is being calculated on the biomass of the fish in the tanks, this is, however, quite difficult in the larval stage. It is useful, to prepare the amount of feed in advance for each feeding event per day, using small cups for each feeding event per tank. This makes sure, that also rather inexperienced persons do feed the right amount.
Feed quality for fish larvae and juveniles
The Newly hatched fish larvae are very vulnerable organisms. This is specifically true for the offsprings of marine species, but also for the larvae from Tilapia. The larvae of Tilapia are hatching with a huge yolk-sac, which provides nutrition in the first couple of days. Beyond that stage, feeding is required. The onset of feeding should start when the larvae have still a small yolk-sac, in order to avoid that they are starving, which may cause low growth rates and higher mortality.
Please keep in mind following features of newly hatched larvae and early juveniles:
- at hatching supposed to be the smallest autarkic vertebrates at earth. They put on body mass from larval size to adults by a factor of 105to 107
- highly vulnerable (predation, starvation, mechanical stress, cannibalism, parasites, diseases), reduced motility
- no buoyancy control right after hatching (swim bladder not yet developed)
- limited size spectrum of potential prey (size of the mouth)
- simply organized digestive organs
- ontogenetic deficiencies in establishing digestive enzyme capacity
If we consider here the propagation of tilapia in an indoor hatchery, in the beginning the tilapia larvae needs micro particulate feed as small as about 300µm (since live feed is normally not available). The size of the feed needs gradually to be increased until fingerling size up to 700 - 1000µm..